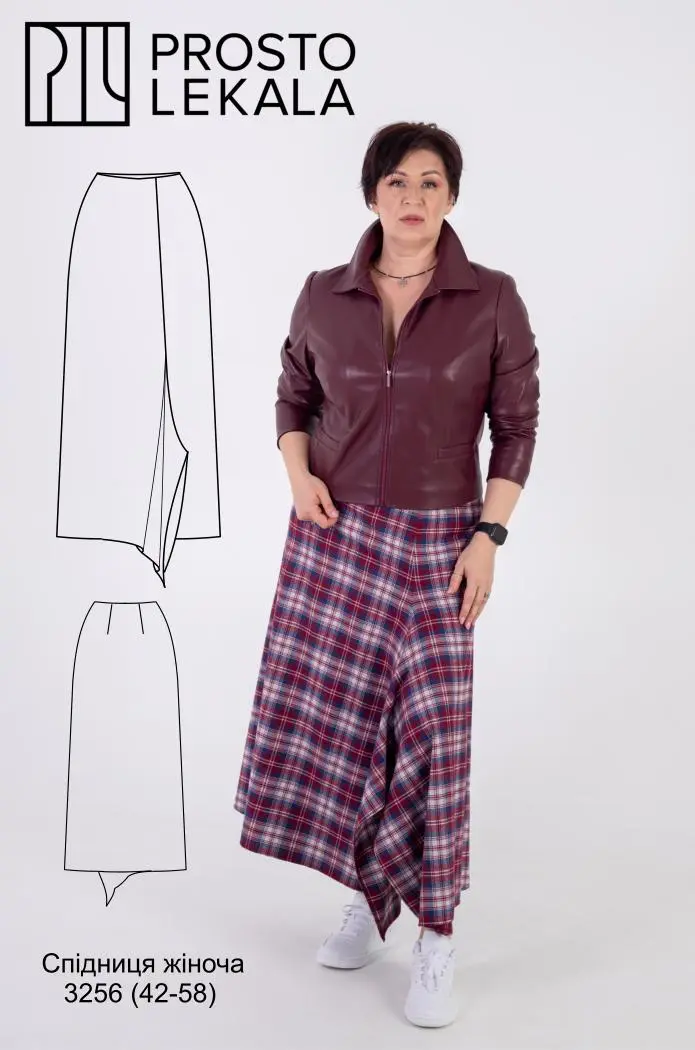


Skirt for women.
Sewn from shirting fabric.
The pattern pieces are suitable for suiting fabrics: crepe, gabardine, tiare, twill, Barbie fabric and satin.
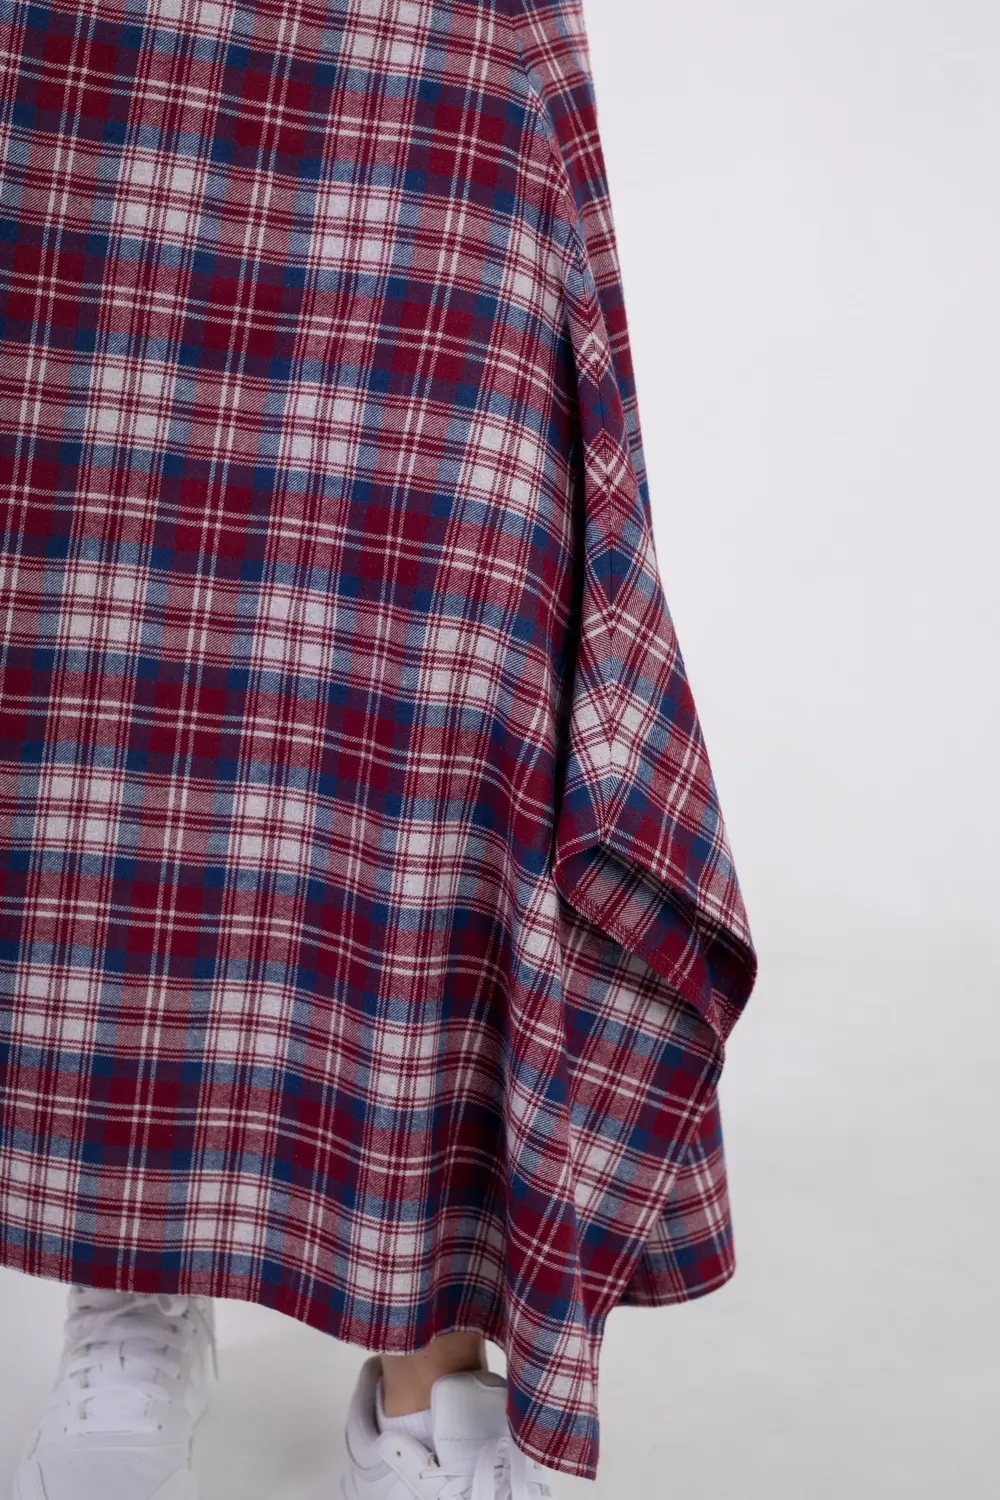
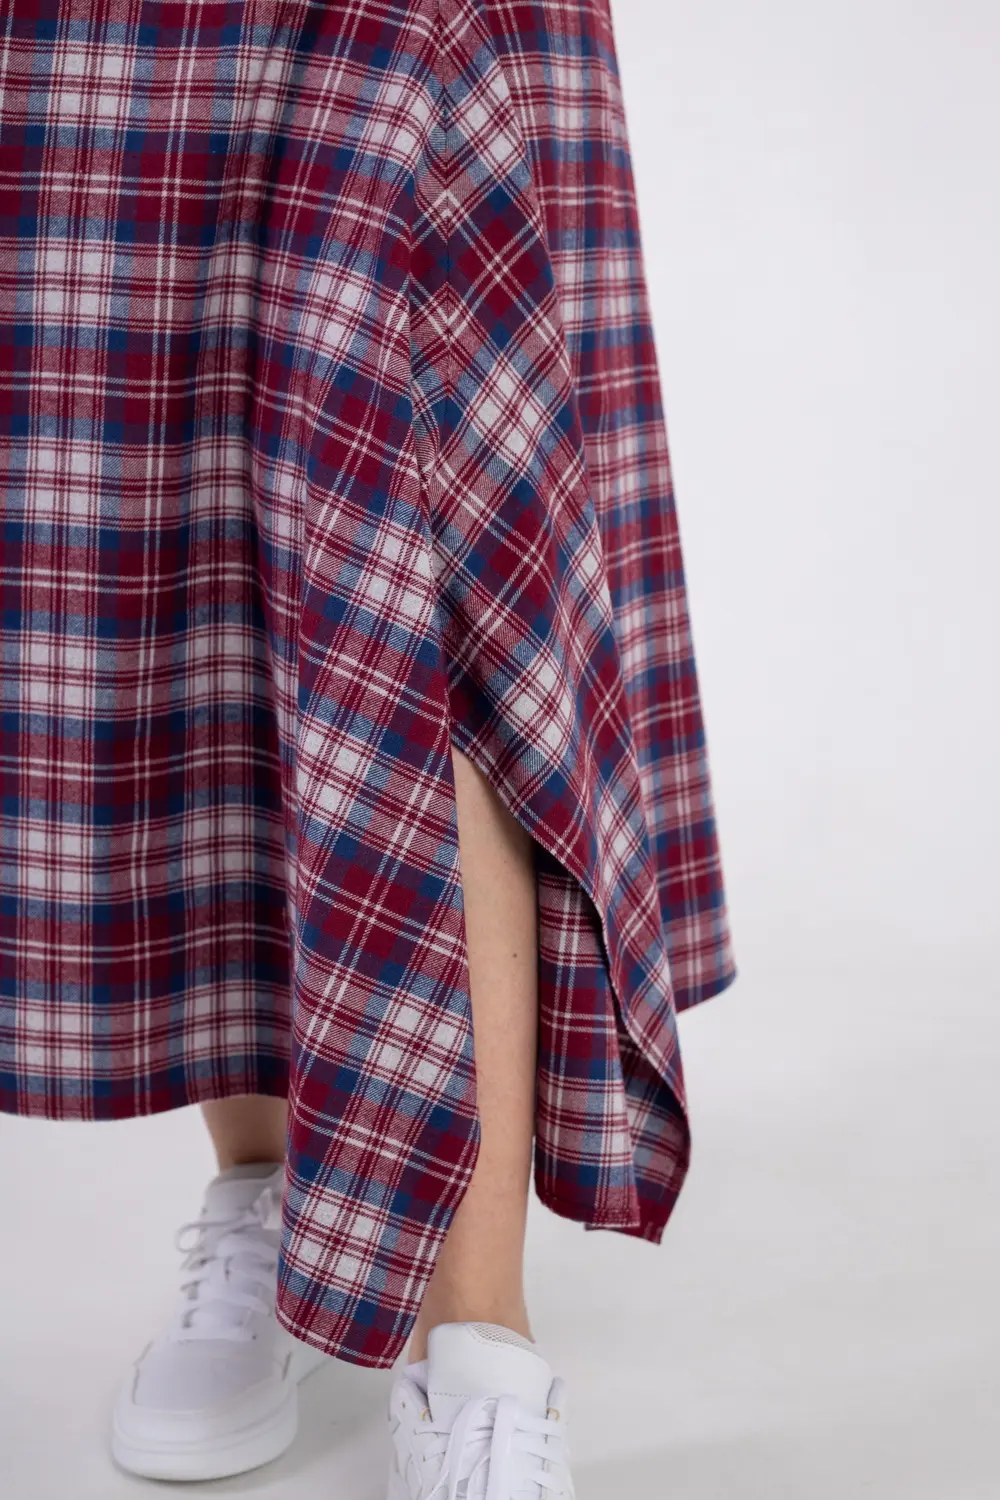
The silhouette widens toward the hem.
Waist facing.
Decorative shaped seam on the front.
Darts on the back.
Invisible zipper closure on the left side.
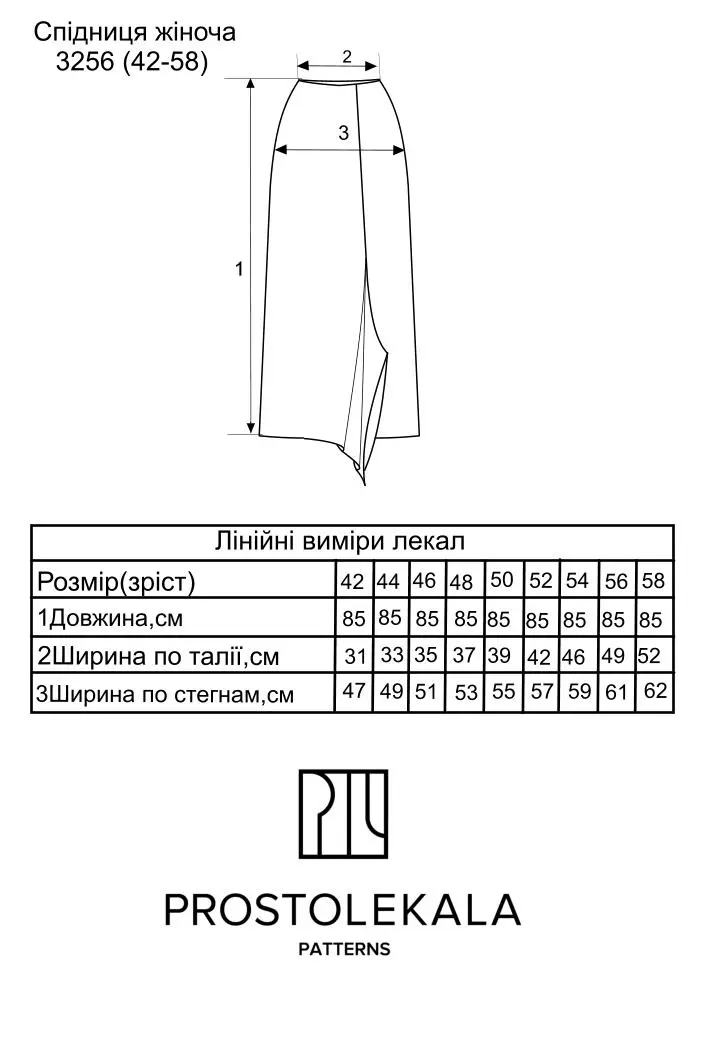
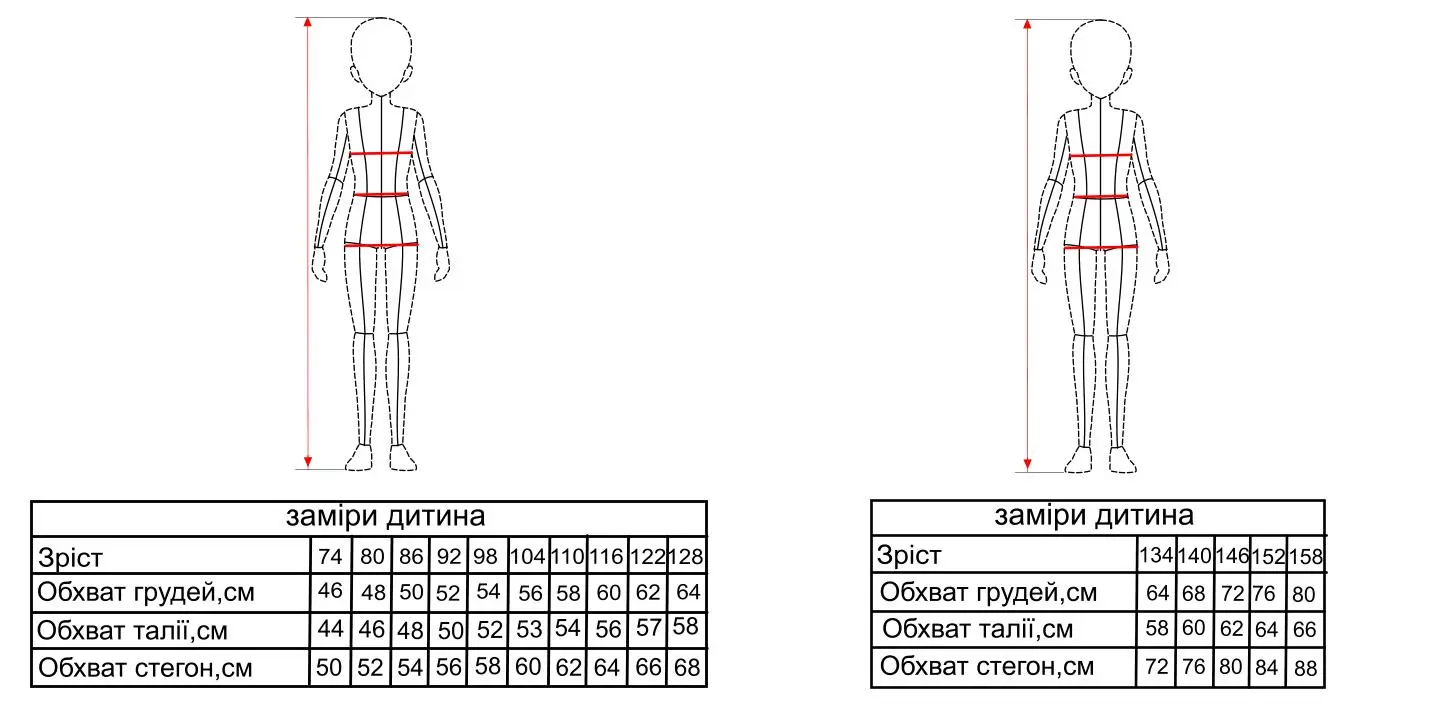
When choosing the right size, please use the size charts provided below.
To determine an adult size, measure the chest circumference, divide this value by two, and you will get the size.
For example, a chest circumference of 100 means size 50.
Check the chart and compare it with the waist and hip measurements.
After you have chosen the actual size, please pay attention to the finished garment measurements based on the patterns.
The measurements can be found in the gallery of each model.
Also consider the fabric properties.
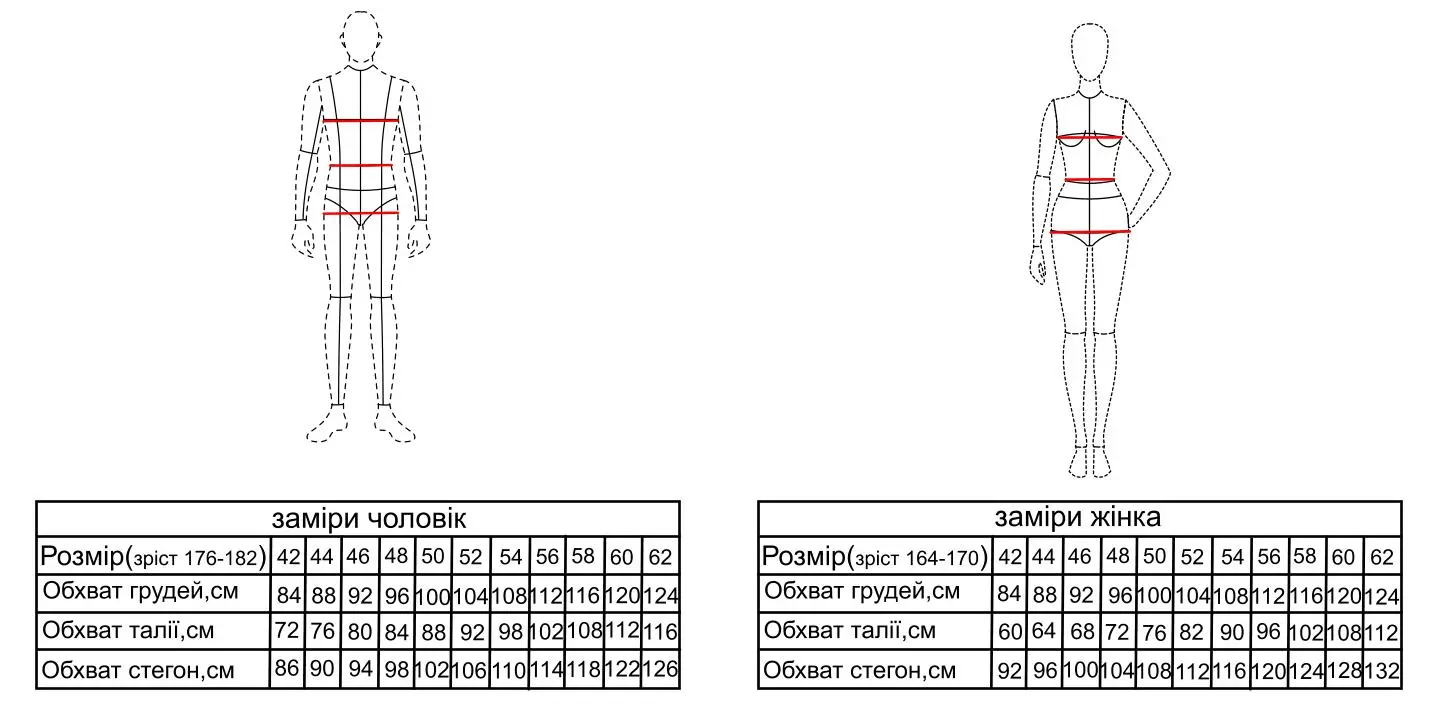
For children, measure height and check the chest, waist, and hip measurements in the chart.
The ease allowance is given for standard body circumferences.
Standard sizes are listed in the "Choosing a size" section.
| Ease allowance | см |
| At waist | +2 |
| At hips | +2 |
Required notions: invisible zipper.
| Required materials | |||||||||
| Size | 42 | 44 | 46 | 48 | 50 | 52 | 54 | 56 | 58 |
| Main fabric, 1.5 m wide | 1.35* | 1.40* | 1.45* | 1.55* | 1.80* | 1.80* | 1.80* | 1.80* | 1.80* |
| Fusible interfacing, 1.5 m wide | 0.15* | 0.15* | 0.15* | 0.15* | 0.15* | 0.15* | 0.15* | 0.15* | 0.15* |
* fabric consumption is given without allowances for shrinkage, skew, gaps and other technical allowances;
** the length of the elastic tape is approximate and depends on the density and stretch of the tape;
Immediately after payment for the “Electronic Pattern,” a zip archive will be delivered to your personal account.
The zip archive must be unzipped and the files downloaded to your device.
If you plan to download the files to your phone, please check whether an archiver app is installed.
The folder contains:
1. A document with a technical drawing, a table of measurements based on the finished pattern pieces (lengths and widths),
a short description of the model, all required materials for each size separately (main fabric, lining, fusible interfacing, elastic, buttons, etc.),
a fusing/interfacing placement diagram (if interfacing is recommended for this model),
the sewing process steps and a miniature layout of the pieces for convenient pattern assembly in PDF format.
2. A photo of the selected model with a technical drawing, the model number, and the available sizes.
3. A recommended fabric layout.
4. A PLT file for self-printing on a plotter, 90 cm width.
Pattern pieces for one size with seam allowances, grainline, required notches, and auxiliary outlines marked.
5. A PDF file with the pattern for self-printing on a printer.
Pattern pieces for one size with seam allowances, grainline, required notches, and auxiliary outlines marked.
Additionally, you can order the “Printing Service.” The “Electronic Pattern” is provided by default.
The order is completed within one to three days.
You will receive, via Nova Poshta, printed pattern pieces on thick kraft paper (paper weight 80)
for one size, with seam allowances, grainline, required notches, and auxiliary outlines marked.
These pattern pieces do not need to be taped together—only cut out. If desired, you can also order “Printing of Technical Documentation” —
1. A document with a technical drawing, a table of measurements based on the finished pattern pieces (lengths and widths),
a short description of the model, all required materials for each size separately (main fabric, lining, fusible interfacing, elastic, buttons, etc.),
a fusing/interfacing placement diagram (if interfacing is recommended for this model),
the sewing process steps and a miniature layout of the pieces for convenient pattern assembly in PDF format.
This document is already available in electronic format in your personal account.
Download the PDF patterns to your device.
In the printer settings, select 100% scale.
Neatly stack the A4 sheets and place them in the printer tray.
First, print the first page with the test square.
Measure the sides of the square with a ruler. The square must be 10×10 cm.
Only after confirming the square is 10×10 cm, print the entire pattern.
In the upper-left corner of each A4 page, there is a letter and a number. The letter indicates the row; the number indicates the sheet’s position in the row.
Together with the pattern, you will receive a document that contains a layout diagram for the PDF sheets. Use it as a guide when arranging the pages.
Arrange the pages by rows.
Assembly: In the top row, trim the right margin. Overlap the next sheet onto the untrimmed part and glue it in place. In each lower row, trim the top and right margins. Overlap the sheets onto the untrimmed part and glue them in place.